Spinning up a Matrix Homeserver in Ubuntu 20.04 in 15min*

This guide was adapted from Jonathan Bossenger’s guide here. He spins up in SQLite and then migrates to Postgres where I kept running into problems, so here I trim it down a little more to go right into Postgres. Also Arul Muhammad’s guide here can be of use if you run into any issues. Also, all the other matrix guides normally reside here. Mathew Hodson(co-founder of matrix), has a video guide here that does everything including jitsi.
With the DNS record set, I was able to go from booting the VM, to logging in with my admin account within 15min. However, the fine print is that the DNS setting may take up to 48 hours to update, but technically, my effort was about 15min.
Requirements
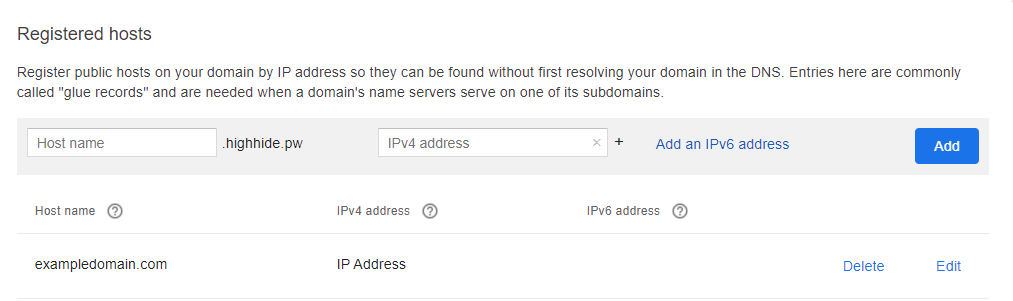
- DNS record already pointed to your server (in this example, I’m spinning one up at exampledomain.com. Replace that domain with yours wherever you see it in this guide
- Root access to a server running Ubuntu 20.04 to host it with a static external IP address.
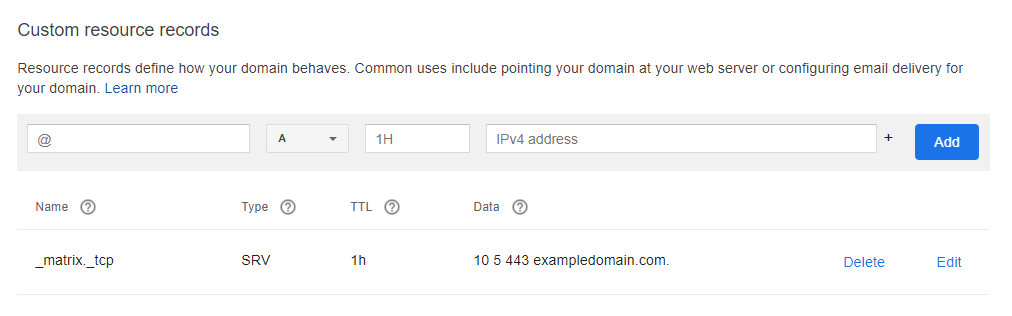
- A SRV DNS record for _matrix._tcp pointing to “10 5 443 exampledomain.com”. (not “required”, but is used for eventual federation.)
I’m using GCP and google domains here. Feel free to host yours wherever.
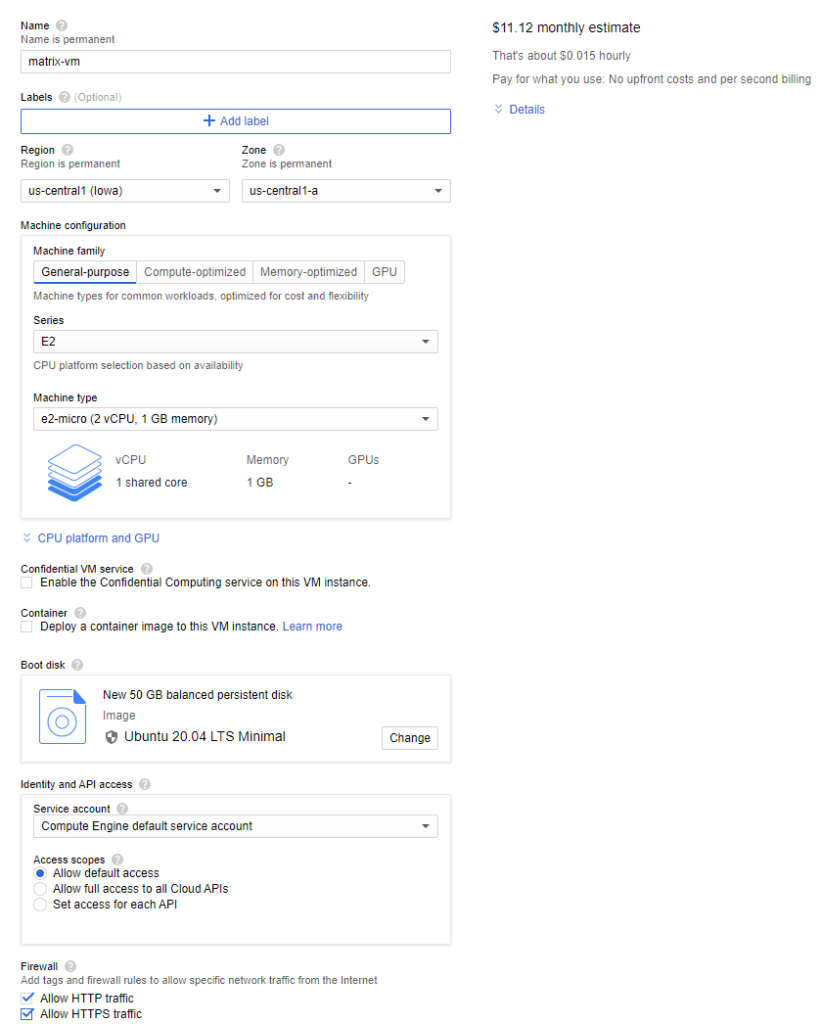
I have spun up a e2-micro instance in Google Cloud with 2vCPU and 1GB of memory with a 50GB disk for $11.12 a month. This might even be overkill for what I end up needing though. After creating, be sure to reserve a static external ip address. That ip address is what you want your domain to point at.
1.) Initial Packages and Matrix Synapse
Once I’m able to ping my domain and get a return on the IP address, I drop into the server and sudo so I can run these all as root.
sudo su
Make sure everything is up to date.
apt update && apt upgrade
Then, install any dependencies for the matrix-synapse server software.
apt install lsb-release wget apt-transport-https
While there are official matrix-synapse packages in the Ubuntu repositories, the matrix-synapse docs recommend using their own packages. This adds the new packages.
wget -qO /usr/share/keyrings/matrix-org-archive-keyring.gpg https://packages.matrix.org/debian/matrix-org-archive-keyring.gpg
echo "deb [signed-by=/usr/share/keyrings/matrix-org-archive-keyring.gpg] https://packages.matrix.org/debian/ $(lsb_release -cs) main" | tee /etc/apt/sources.list.d/matrix-org.list
Once the repository is set up, update and then install matrix synapse.
apt update
apt install matrix-synapse-py3
During the install, it’ll ask for the domain, in this example I’m entering exampledomain.com and selecting “No” to not share any anonymous statistics.
2.) Install Postgres
Once synapse is done installing, install postgres.
apt install postgresql postgresql-contrib
Generate a password with this command and save it in a secure note. Don’t copy mine, copy yours.
cat /dev/urandom | tr -dc 'a-zA-Z0-9' | fold -w 32 | head -n 1
j70v1vHGAr7xXtTxtf7CGRtMAlU6pH5u
The createuser command will ask you for a password, use the hash generated that you saved in the note from up above.
Now we can create the database, by logging into the Postgres database server, while operating as the postgres system user.
psql
Once logged in, we can create the database, and assign it to the synapse_user.
CREATE DATABASE synapse
ENCODING 'UTF8'
LC_COLLATE='C'
LC_CTYPE='C'
template=template0
OWNER synapse_user;
That should create a database that the synapse_user will control. Now we should look at editing the hba file. To see the location run the following.
show hba_file;
My pb_hba.conf file was located at /etc/postgresql/12/main/pg_hba.conf so I ran the following to edit it.
nano /etc/postgresql/12/main/pg_hba.conf
Towards the bottom of the file, add # Synapse local connection and the line beneath it with “::1/128” exactly under the IPv4 section. These files are affected if the number placement it off.
# Database administrative login by Unix domain socket
local   all             postgres                                peer

# TYPE  DATABASE        USER            ADDRESS                 METHOD

# "local" is for Unix domain socket connections only
local   all             all                                     peer

# IPv4 local connections:
host    all             all             127.0.0.1/32            md5

# Synapse local connection:
host    synapse         synapse_user    ::1/128                 md5

# IPv6 local connections:
host    all             all             ::1/128                 md5

# Allow replication connections from localhost, by a user with the
# replication privilege.
local   replication     all                                     peer
host    replication     all             127.0.0.1/32            md5
host    replication     all             ::1/128                 md5
Ctrl+x to save and you’re done with that, now lets get to matrix.
3.) Configure Matrix
We need to make a password, run the following command.
cat /dev/urandom | tr -dc 'a-zA-Z0-9' | fold -w 32 | head -n 1
The server outputs the random key, this is going to be used for registration. Do not copy mine below, that’s just what mine looks like. Copy yours and put it into a secure note.
kyZNzRUmZE6APP7Habv6qnAd8Xz3EVl6
The next step is to edit the homeserver.yaml configuration file.
nano /etc/matrix-synapse/homeserver.yaml
In nano, Ctrl+w to look for registration_shared_secret entry, in GCP its in the top right under the keyboard symbol. look for the one not involving captchas, but just registration_shared_secret:. update it with your generated key below. Remove any # that comments out the line and makes it light blue.
registration_shared_secret: "kyZNzRUmZE6APP7Habv6qnAd8Xz3EVl6"
Ensure the server_name field has the domain name in quotes. Postgres requires the server_name variable to be defined.
server_name: "exampledomain.com"
Then, comment the current database line out with # turning it blue and ensure the new database information below is added exactly. If there are errors when synapse starts, it’s often times its because there is a space somewhere in here that shouldn’t. I forgot to put my password in double quotes the first time I tried starting it and it had an aneurysm. The homeserver.yaml file is pretty big so you might have to scroll a little bit. Ensure that the password is the same hash you used for synapse_user.
#database:
#  name: sqlite3
#  args:
#    database: /var/lib/matrix-synapse/homeserver.db

database:
  name: psycopg2
  args:
    user: synapse_user
    password: "j70v1vHGAr7xXtTxtf7CGRtMAlU6pH5u"
    database: synapse
    host: localhost
    cp_min: 5
    cp_max: 10
Save the homeserver.yaml file with a Ctrl+x
Then, I start the matrix-synapse service.
systemctl start matrix-synapse
You can check the status with this command.
systemctl status matrix-synapse
ss -plnt
You should see active (running) in green. If not or if there was a failure, look into some of the errors and look for if a line is mentioned in the errors and go to that in the homeserver.yaml file. Once you’re good, enable it on boot with.
systemctl enable matrix-synapse
4.) Generate SSL Certificate with Certbot
apt install certbot
This installs certbot, then generate the SSL certificate. Use your email address, and the subdomain we have pointing to the IP address of the webserver.
certbot certonly --rsa-key-size 2048 --standalone --agree-tos --no-eff-email --email user@domain.com -d exampledomain.com
Certbot queries the domain to validate that its coming from the same source, so if that DNS record hasn’t updated, you’ll run into errors with it.
Once this is completed, the SSL certificate and chain were saved at /etc/letsencrypt/live/exampledomain.com/fullchain.pem and the SSL key file was been saved at /etc/letsencrypt/live/exampledomain.com/privkey.pem. It’s always a good idea to write this information down somewhere in case you need these in the future. Like right now as we setup nginx
5.) Setup NGINX as a Reverse Proxy
apt install nginx
Once installed, create the virtual host file.
nano /etc/nginx/sites-available/matrix
Copy and paste the following into notepad and replace “exampledomain.com” with your domain. If done correctly the certificate locations should exist at the same appropriate slot. Paste the result into the nano screen.
server {
    listen 80;
    server_name exampledomain.com;
    return 301 https://$host$request_uri;
}

server {
    listen 443 ssl;
    server_name exampledomain.com;

    ssl_certificate /etc/letsencrypt/live/exampledomain.com/fullchain.pem;
    ssl_certificate_key /etc/letsencrypt/live/exampledomain.com/privkey.pem;

    location /_matrix {
        proxy_pass http://localhost:8008;
        proxy_set_header X-Forwarded-For $remote_addr;
        # Nginx by default only allows file uploads up to 1M in size
        # Increase client_max_body_size to match max_upload_size defined in homeserver.yaml
        client_max_body_size 10M;
    }
}

# Matrix Federation
server {
    listen 8448 ssl;
    server_name exampledomain.com;

    ssl_certificate /etc/letsencrypt/live/exampledomain.com/fullchain.pem;
    ssl_certificate_key /etc/letsencrypt/live/exampledomain.com/privkey.pem;

    location / {
        proxy_pass http://localhost:8008;
        proxy_set_header X-Forwarded-For $remote_addr;
    }
}
Once the file is saved and closed with Ctrl+x, then with the following command, enable the nginx virtual host, and test to make sure everything is ok.
ln -s /etc/nginx/sites-available/matrix /etc/nginx/sites-enabled/
nginx -t
Finally, restart nginx, and enable it to start at system boot.
systemctl restart nginx
systemctl enable nginx
6.) Setup Firewall
Using the UFW firewall command below. This adds rules for ssh, http, https and the federation port used to communicate with other matrix servers.
for svc in ssh http https 8448
do
ufw allow $svc
done
After the rules are added, I enable the firewall and check the firewall rules, using these two commands.
ufw enable
ufw status numbered
7.) Test Federation
If everything is set up correctly, at this point you should be able to browse to the below URL, enter the server domain, and check if a successful call can be made to your homeserver.
https://federationtester.matrix.org/
8.) Add Yourself as Admin
If everything is set up correctly, you should start by adding the first user, yourself.
sudo register_new_matrix_user -c /etc/matrix-synapse/homeserver.yaml http://localhost:8008
The server will prompt for username, password, and if this user should be admin. Type yes, once the server returns a a success, you can login via Element here or download a client here. If you enabled registration, users can register as normal users just by entering your domain, but if you have it disabled, you have to run the above command every time you want to add someone else. It all comes down to your use case. How you run your server and the privacy is entirely up to you. On that note, depending on how public you want it, here is some guidance on making even your public homeserver pages private, consult this guide.
Godspeed.
If this helped you, say whatup, I’m @smalls:valinor.pw