Remote Playing PC Games: Building your own “Stadia” in Google Cloud

It’s been about a year since my last blog about remote playing PC Games. Has has my personal use of it changed? Did I stick with it, or was it a one time experiment?
Well, as of today, I play about 25% of my PC games on the couch via remote play and I would probably be there more if I didn’t just buy a fancy new G-sync monitor for my desk. But the bigger shift has been personally, I moved to a different apartment and with it, my internet went from 500d/500u to about~700d/35u on a good day. This naturally means nothing is streamed externally now, fiber definitely spoils you, but now that I’m in a different situation with worse internet, I’ve wondered what it would be like if I just moved the entire PC to the cloud. Could I essentially create my own personal cloud based “streaming service” with my own steam library? The good news is that it’s actually pretty simple to get some beefy virtual machine up and running in GCP, but the bad news is it’s still not really cost efficient at all. However, Google Cloud is giving $300 in free credit so what the hell, let’s go burn some Google bucks making our own Stadia.
This is actually much simpler than it sounds if you’re not familiar with GCP, GCP has recently started offering Nvidia T4s specifically meant for this use case in a one click marketplace instance, that is going to save us a lot of time.


Brian Regan has a great bit about Monster Truck drivers where in their interviews they ramble incoherently about their engine as if you know exactly what they they’re talking about and sometimes I worry I sound like that.

The relative performance of a T4 puts it around an RTX 2070 which means we should be able to at least play some pretty demanding games, but before we fire up anything, how much is this gonna cost? The T4 has 16GB of VRAM and the retail is at least above $2000.
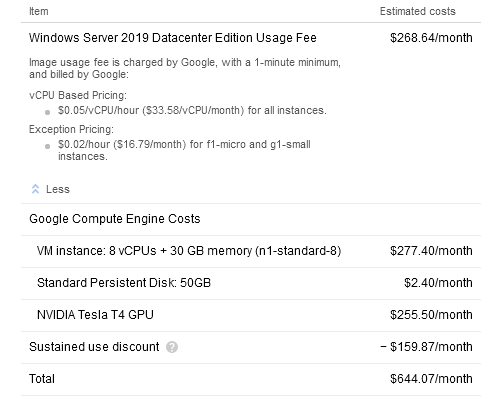
You might be able to get by with a VM instance with half of those CPU and memory resources(if there is one with an available GPU), but $644 is around 80 cents an hour and since you don’t pay when it’s not running, just think of it as a fancy arcade machine in the sky that can also host and render stuff if you need it to.
Also, there are costs for network traffic, It’s about $0.10 per Gb, which means according to my test on a previous blog post. It would take about 300 seconds to hit 1GB of traffic, which means that a full 50Mbps stream at 60fps could actually cost about $2 an hour…So, Yeah.
Installation
Disclaimer: Even though google has a $300 credit, the virtual machine in this use case runs over $600 a month, so if you’ve never done anything like this, it might be best to sit this one out unless you’re looking to specifically learn. This blog is primarily is an experiment to examine the current state of remote playing across various regions. If you do experiment with virtual machines, you are the risk owner and I am not responsible for any charges you incur from GCP. If you want to skip this section to see how they run, jump on down to the Testing section.
Moonlight normally is my go to streaming app as I feel as if it’s the best quality when streaming, but I ran into a number of issues with the GPU drivers until I found Sanuj Bhatia’s great guide on Techquila. They go into more detail on doing it manually on the command line and setting up the GPU quota, but to make a long story short, many of the ordinary protocols I’ve used to stream aren’t easily configured on this VM, so the de-defacto solution is to play this over Parsec, which isn’t that bad, it actually has some cool multiplayer ability, and you should be able to play over Steam Remote Play as well. I’ll see about getting Moonlight working on it in a later blog post, it could seamlessly populate on moonlight on my TV.
-
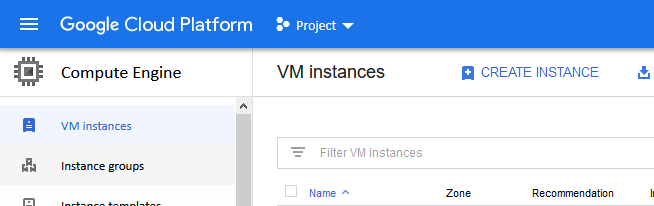
When your project is ready, navigate to the Compute Engine page of Google Cloud (Navigation Page -> Compute Engine -> VM Instance ) and click on Create Instance.
-
Click on Marketplace on the left.
-
Search for “NVIDIA Gaming PC” and it should show you a couple of options including Ubuntu, but we want to stick with Windows Server for now.

- Click Launch and you might be greeted by a notification that you’re over your GPU quota like below. By default, account quotas initially set to zero and you have to click on your quota page and search for that quota to request one, it normally takes a minute or so to request an update to 1 and to get approved it normally takes another minute or so. You might even have to enable billing. Click on the quota page link to go to the page and increase your quota in the region, come back to this page when that’s done.

You have to select a region that has a GPU available and that you and is closest to you. Go to GCPing or cloudpingtest.com to see the GCP region with the lowest ping to you. It might not be a close as you think, I live in Long Beach, California but the closest location to me that fit both of those requirements was in Portland Oregon.
-
After you have opened up your quota, come back to this page (you might have to just restart at step 1) and name your virtual machine. Name it something cool, it’s very important.
-
In the Boot Disk Type dropdown, select SSD Persistent Disk, it makes the world of a difference. If you don’t some of the games might load up assets as slow as this.

- The default boot disk is 50GB, so you’re going to want to change that to at least 250GB depending on what you want to install. If you want to install 1TB, go ahead, you can make it whatever you want, you’re the Willy Wonka of this gaming factory now Charlie. Click Create and watch this elevator go. Take a 5min coffee break and let windows install. Reminder: Any space over 50GB will be extra space in Disk Management that you will need to add as a volume later in windows for it to show up as a drive.
-
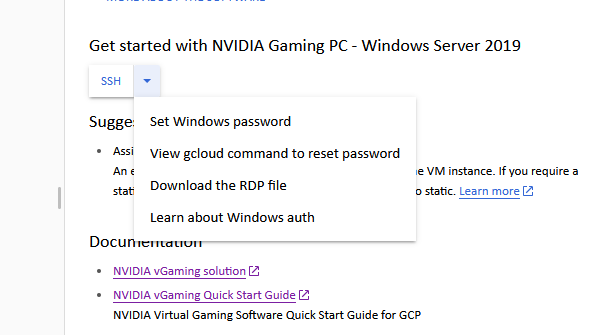
Either in the deployment screen or the main Compute Engine screen, there should be either an SSH or RDP dropdown, open it up and there should be a number of options, click on Set Windows Password.
-
It will prompt you for the username of the account you will use to login, then generate a long random password, copy that to your password manager.
-
Open back up the dropdown and click on Download the RDP file. Once it is downloaded, open it and windows should attempt to connect to the server, enter your username and paste the password you copied and connect to the instance.
-
Once on the desktop, click on Google Cloud SDK Shell on the desktop.
12.Type “powershell” as a command and press enter.
13.Paste the following script into the window and click enter. This script downloads a Parsec prep tool that will prepare the VM for streaming and update the needed GPU drivers.
$LocalArchivePath = “$ENV:UserProfile\Downloads\Parsec-Cloud-Preparation-Tool”
(New-Object System.Net.WebClient).DownloadFile($ScriptWebArchive, “$LocalArchivePath.zip”)
Expand-Archive “$LocalArchivePath.zip” -DestinationPath $LocalArchivePath -Force
CD $LocalArchivePath\Parsec-Cloud-Preparation-Tool-master\ | powershell.exe .\loader.ps1
These are from a script from James Stringer on github that automates a lot of the driver installs, what an absolute time saver. The script also prompts you to be able to launch parsec automatically when the server starts. Type ‘Y’ when asked on the prompts.
-
Once it is complete, start up Parsec and login to your account or create one if you dont have one.
-
Once Parsec is running, close the Remote Desktop session window and then connect to the VM with Parsec and avoid using RDP unless you have to, it has a tendency of bickering with the video driver in parsec and can cause black screens and other headaches that end up forcing a system reboot. (did I mention this isn’t nearly as polished as bigger turnkey solutions?)
-
Once you connect to the VM with parsec, install steam or whatever games you want and happy gaming. Remember to turn off the VM when you’re done. That is important if you don’t want to be surprised by a bill.
Testing
If you’re curious how latency affects a game, try out Input Lag Simulator. It’s a quick little app that simulates latency. However, at the end of the day the best test is to try a service yourself. Some 3rd person games are more forgiving than FPS shooters, but unfortunately, Los Angeles was out of GPUs, so the closest place I was able to set this up is Portland, Oregon so testing speed and latency from a variety of locations will be an interesting test.
Long Beach, California

Here is some speed tests out of my apartment, Ookla.
-
GCP: 1247Mbps Down/ 2552Mbps
-
My Apartment: 877Mbps Down / 40Mbps Up
Even though my internet says 877Mbps, it really feels much slower. I want to point my finger at my monitor and shout, “The devil is a liar!”, because it feels like a quarter of that speed. It’s normally very spotty, but when I blog after midnight, it’s on its best behavior I guess. You would think with those numbers I’d be able to get close to a 100Mb of throughput, but unfortunately that’s not the case when it takes dozens of hops to get to Portland.
[ ID] Interval Transfer Bandwidth [ 4] 0.00-10.00 sec 32.9 MBytes 27.6 Mbits/sec sender [ 4] 0.00-10.00 sec 32.8 >MBytes 27.5 Mbits/sec receiver iperf Done. Ping statistics for XXX.XXX.XXX.XXX: Packets: Sent = 100, Received = 100 Lost = 0 (0% loss) Approximate round trip times in milli-seconds: Minimum = 44ms, Maximum = 48ms, Average = 45ms
Iperf clocks me in around 27Mbps with a latency of around 45ms. Below a video i recorded with around average latency of 50, but I encounter a spike in death stranding. I was downloading some stuff and I believe my girlfriend was streaming Netflix in the other room. It was a helpful spike to get an idea of how latency manifests, but also how Parsec reacts. In my other tests in other blogs I never experienced quite that spike. Words can only say so much so I recorded a video. Pardon the language, it was a little late and I’m feeling good.
Washington D.C.

Speedtest.net via Ookla Kimon’s house: 52Mbps Down / 68Mbps Up
This year at my organization, we were fortunate to get a remote intern from Carnegie Melon University. Kimon Pope, he’s currently in the middle of getting his M.S in Information Security & Policy Management. Check him out on linkedin if you’re in the industry and hiring soon.
Outside of our work responsibilities, I asked Kimon if he could checkout the GCP server and I asked for his thoughts on the performance if he’s never played something over the internet like this. I tried some tunnels and couldn’t get it to work with parsec as of yet, but we have gotten 3 times the bandwidth when we setup a tunnel via putty.
[ ID] Interval Transfer Bandwidth [ 4] 0.00-10.01 sec 11.1 MBytes 9.32 Mbits/sec sender [ 4] 0.00-10.01 sec 11.0 MBytes 9.25 Mbits/sec receiver iperf Done. Ping statistics for XXX.XX.XXX.XX: Packets: Sent = 4, Received = 4, Lost = 0 (0% loss), Approximate round trip times in milli-seconds: Minimum = 70ms, Maximum = 74ms, Average = 71ms
“As a guy that has only really done console gaming growing up (and PC on a rare occasion) I never really considered cloud/remote gaming. However, after trying it out I will say I am impressed. I definitely believe that it can be the future of gaming due to the enhanced features and versatility of it”
Final Thoughts
At the end of about 3 weeks of toying in GCP, I have about $170 credits left, so I still have some more experiments to do. I think GCP is great, personally I migrated this site to it and my built my girlfriends in it as well. This experiment with Nvidia was a fun and interesting, but not really realistic unless i stumble into a pile of cash in the near future.
I didn’t dig too much into mobile testing, but parsec is also an android app and it plays great. I made the featured image Red Dead Redemption 2 on my phone. Sorry if that is “clickbaity” that I used it as the featured image, I’ve blogged about the mobile use case before and here’s a link of it running as well.
This was primarily a toe dipping experience for myself in GCP and to also really see what the GCP network is capable of for a gamer. Stadia is specifically designed differently than this PC instance and I am going to just assume that Stadia runs better not just because they have 7500 edge nodes distributed to be closer to players than Portland to me, but also because its a much more specific use case which will be modified and optimized as it grows a lot more than me and my 1 VM. If you want a deeper peek at the architecture, check out this article which helps lay the foundation for how cloud computing with video games will allow us to step into capabilities that allows us to explore hundreds or even thousands of players playing on the same server with minimal latency.
I still haven’t tested Stadia yet ironically, but I’m not really not ready to make the plunge into full time remote playing unless I can bring the library I already own. Good news from only a couple days ago though, Nvidia’s own streaming service, GeForce Now has opened up the ability to BYOG(Bring your own games from steam and more) so who knows, I might pick into Geforce Now next. As for GCP, I might just stick to non GPU systems for hosting a dedicated server or something for my friends. That’s far more realistic financially and I have friends on both coasts, spinning up something in Iowa is the sweet spot for everyone’s speed and not needing a GPU there will lower my costs substantially. I used to use gameservers.com for my game servers, but I migrated my 7 days to die server to GCP as well.
In the end, I hope you enjoyed this blog, thanks for reading.